Creating Content in Brightspace
About Creating Content in Brightspace

The Content tool serves as a central hub for posting and structuring materials, making them accessible to learners. Course materials are added as “topics” within content modules and can include a variety of resources such as documents, images, media files, URL links, assessments (assignments, quizzes, tests, and discussions), and links to third-party partner content.
This page provides guidance on:
- Adding and Organizing Content: Discover how to structure your course and upload materials to create a seamless learning experience for students.
- Copying and Reusing Content: Learn how to save time by reusing content from previous courses or importing external resources.
- Content Storage: Understand how course materials are stored, organized, and managed in your Brightspace courses.
-
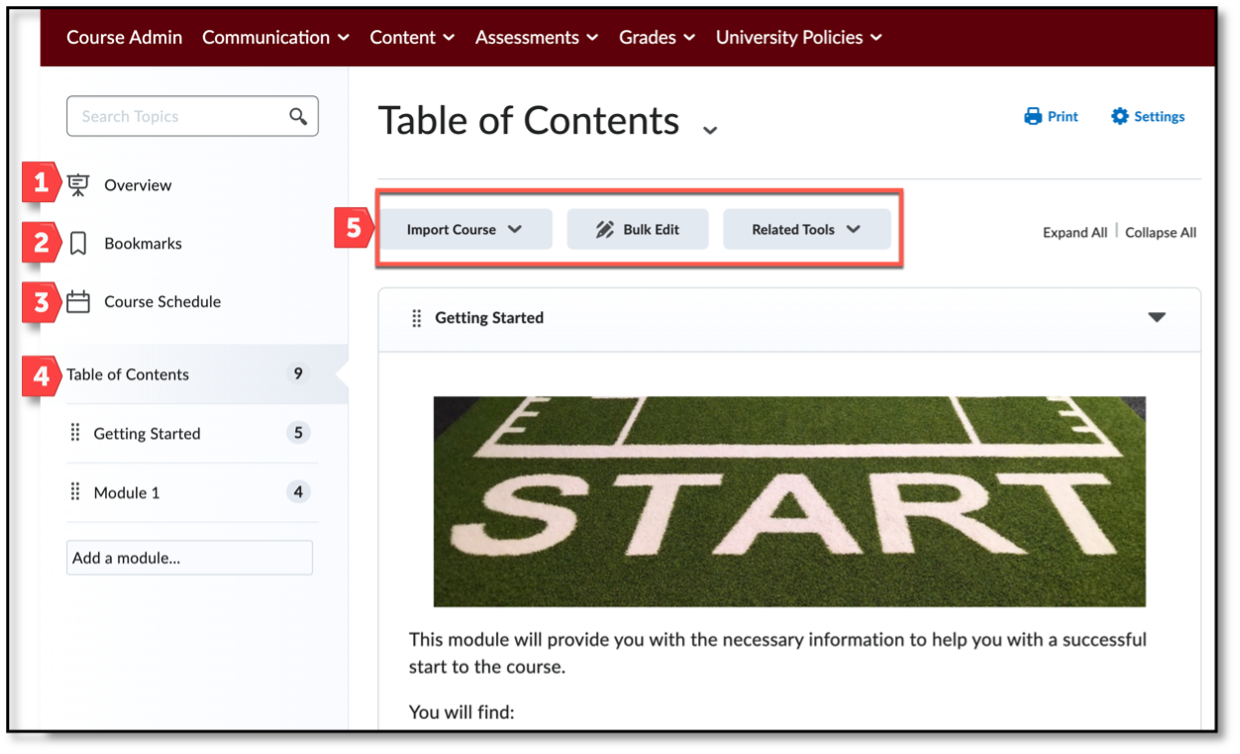
- Overview: the first page a user lands on when accessing the content tool for the first time. Use the Overview page can be used to orient users to the course, content materials, and course expectations. If you decide not to add anything to the Overview page, then it is hidden from the learners' view.
- Bookmarks: Topics you bookmark appear in a list on the Bookmarks page. The number beside the Bookmarks link indicates how many bookmarks you have.
- Course Schedule: The Course Schedule page lists course material due dates, start dates, end dates, overdue course activities, and other course events for the next seven days. If you set availability dates or a due date for a course object, it appears in the Course Schedule page and the agenda view in the Calendar tool.
- Table of Contents: The Table of Contents panel lists all modules available in your course. The number beside each module name in the Table of Contents panel indicates the number of topics where completion tracking is set.
- Course content administration options: Located on the Table of Contents page, these options allow instructors to import and copy course content, bulk edit module content properties, manage course files, and view reports on course content.
-
About Content Storage
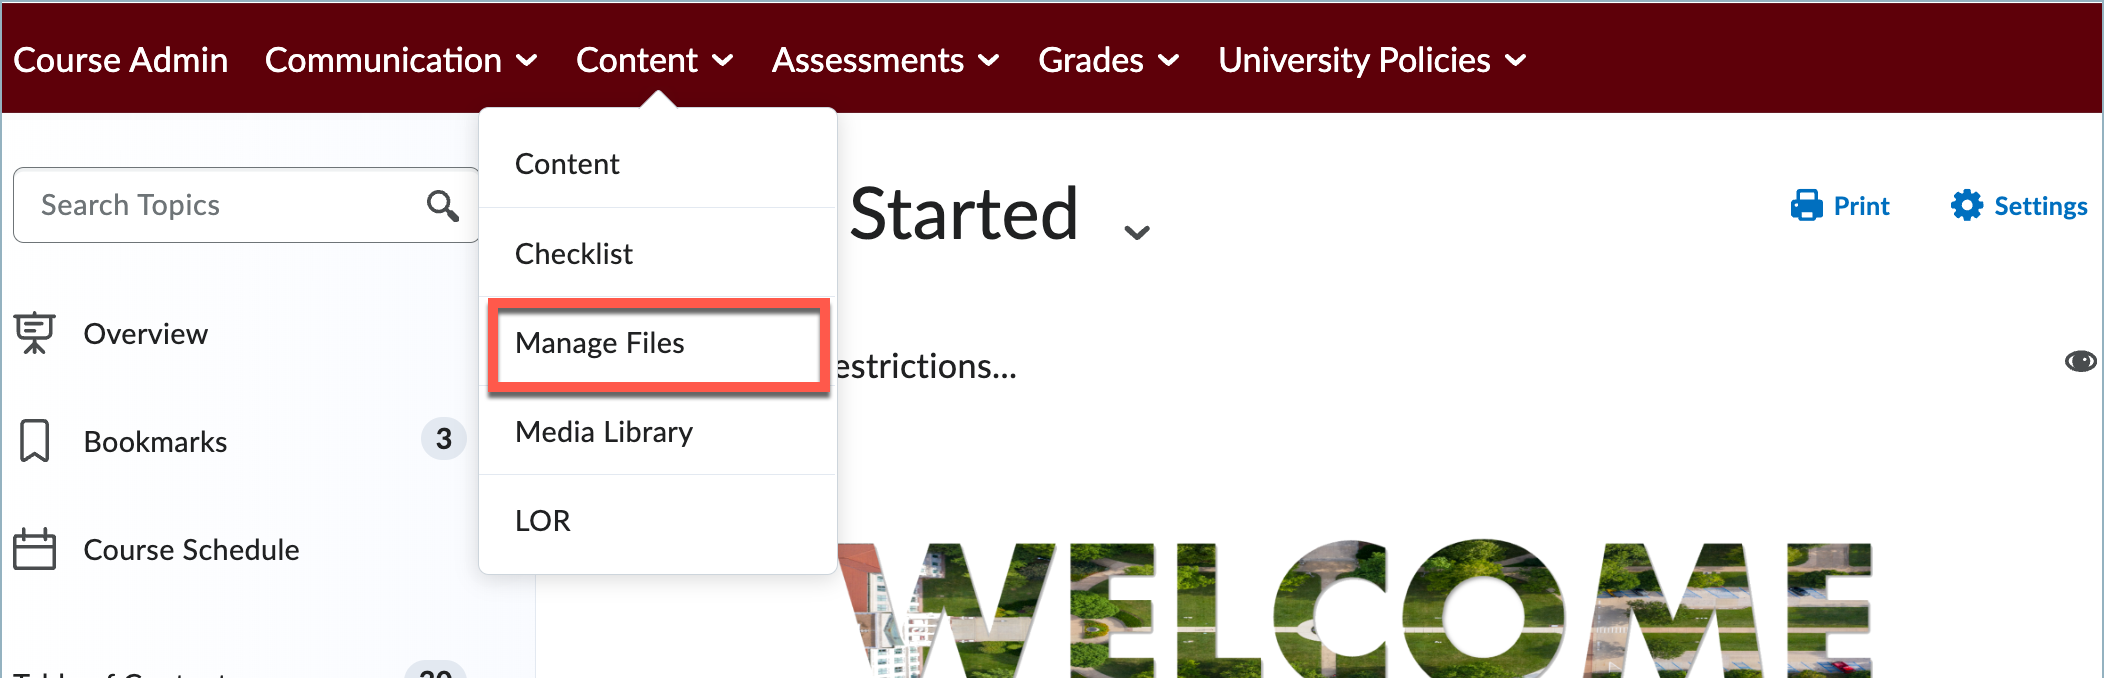
Before you begin adding content, it is important to understand where that content lives within Brightspace. All content topics you create/upload to Brightspace are stored in your Manage Files area.
You can access the Manage files area for a course by selecting Content from the course navigation bar and choosing the Manage Files option.
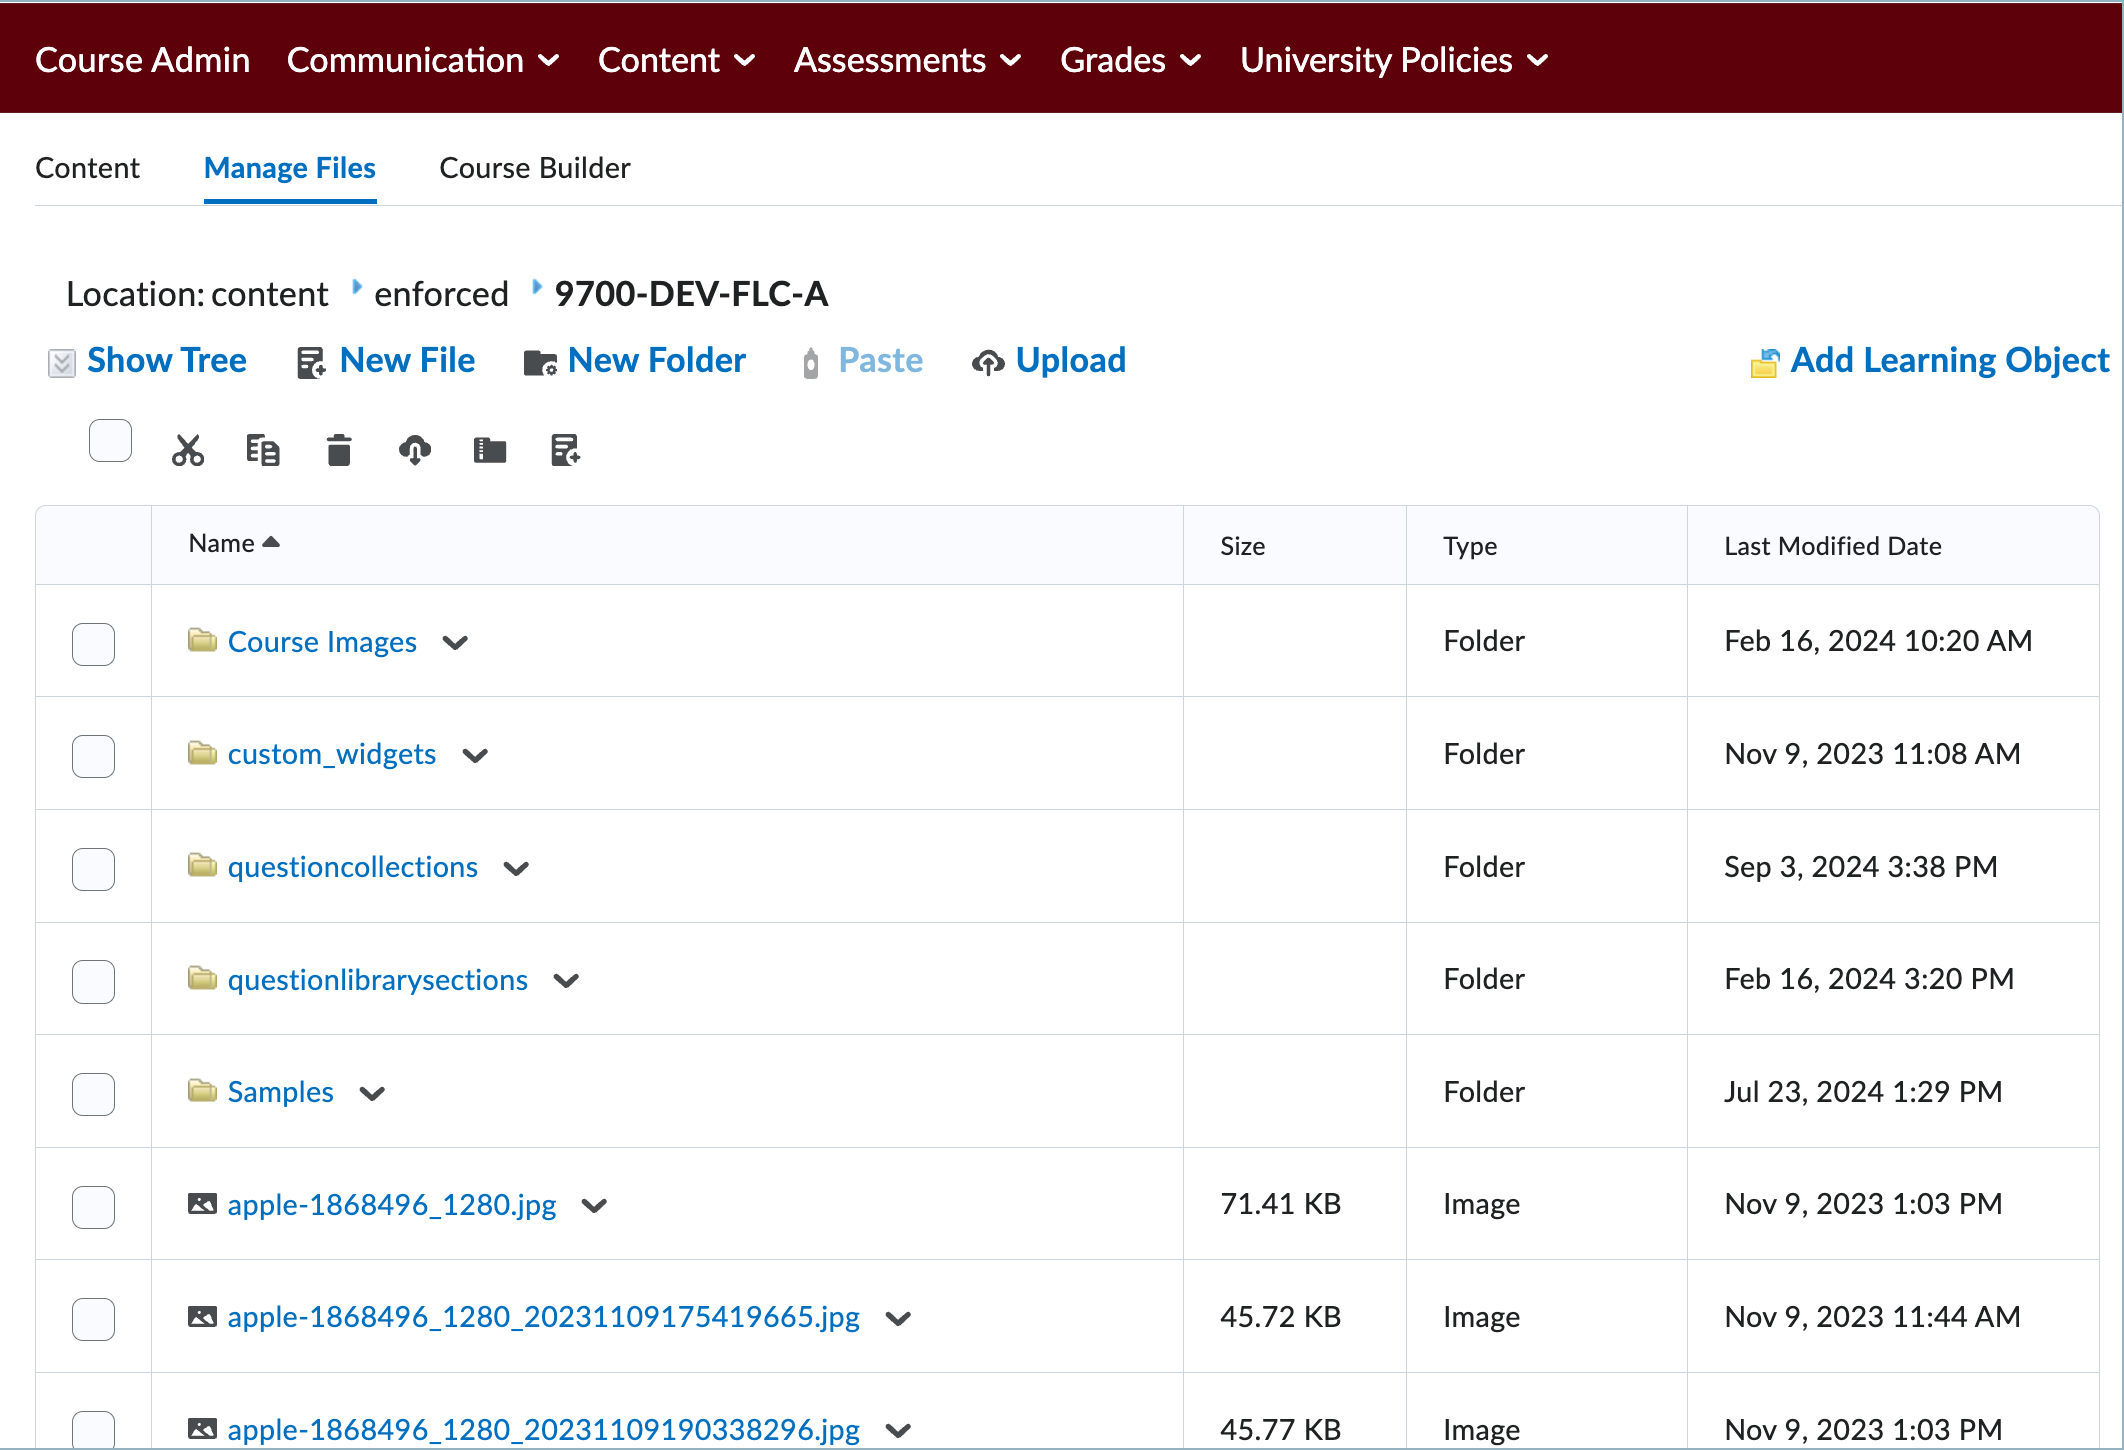
In Manage Files you can create folders to organize your course files. You can also upload files here before linking to them in a content area.
-
A module is an organizational element (like a folder) that represents different chapters, units, or weeks in your course. You must create a module before you can begin adding content to your course.
How to create a module:
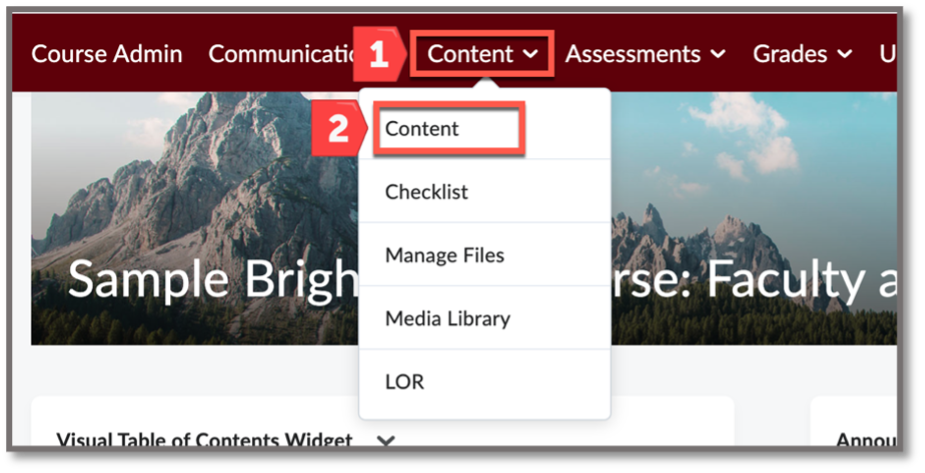
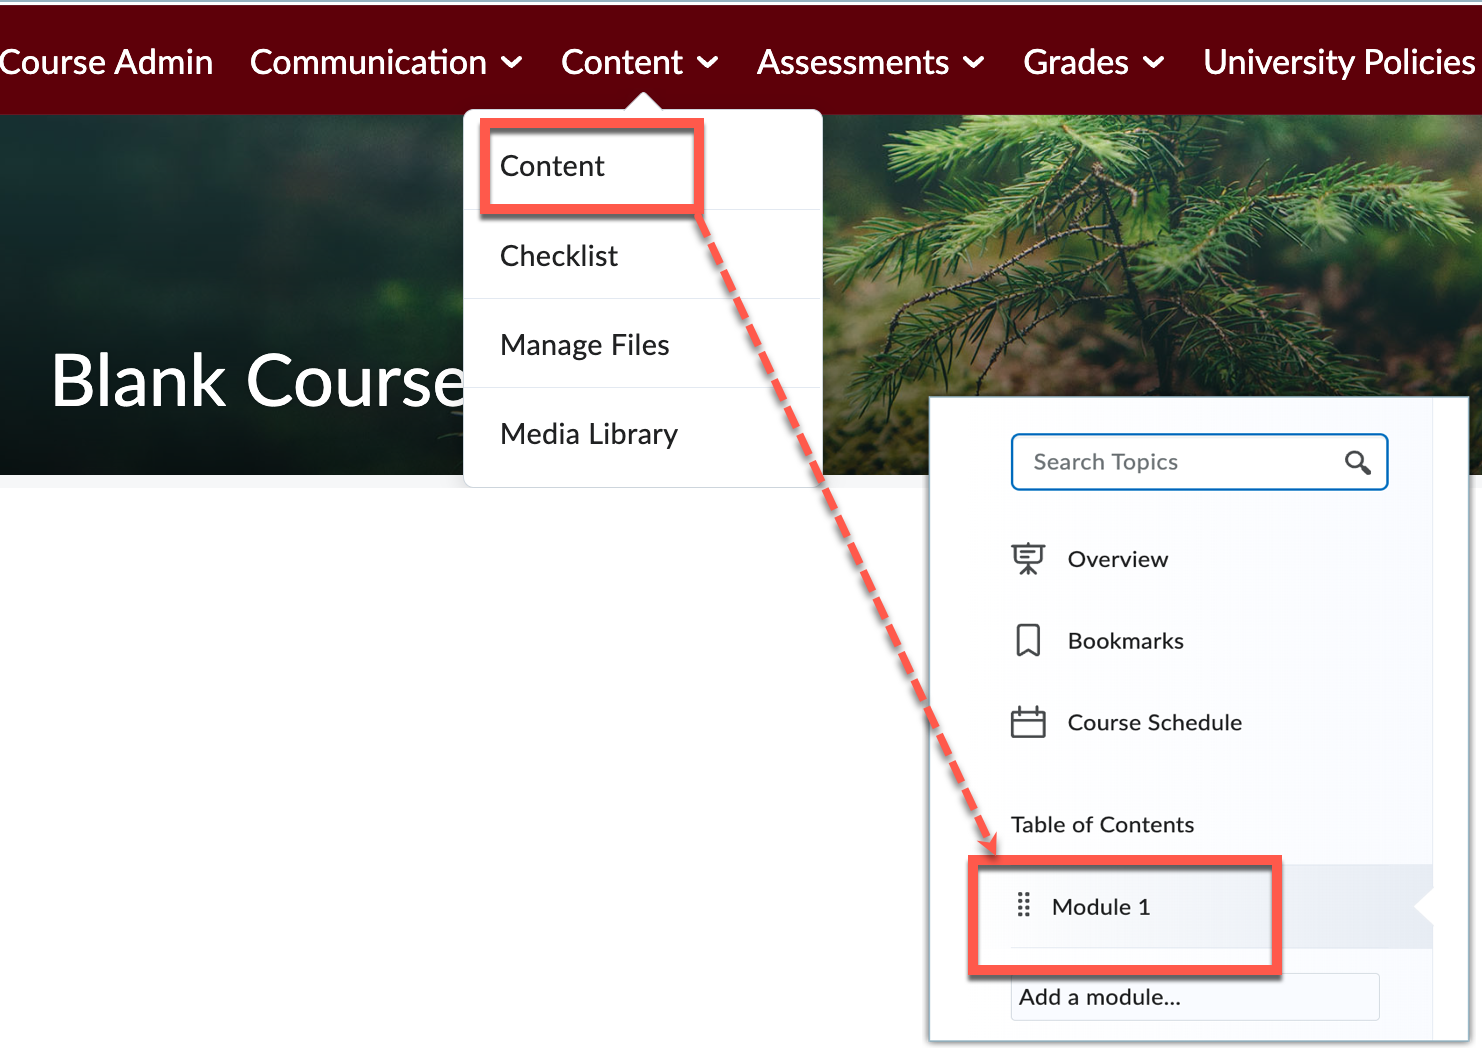
On your course’s navigation bar, select Content to expand the menu and select Content from the list of options.
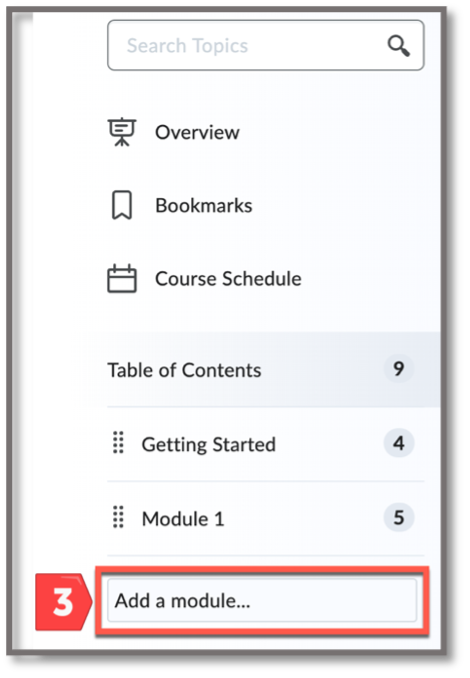
Under the Table of Contents panel along the left, select the "Add a Module" field and enter a name for your new Module. Select Enter to save and create the module.
Once created, Brightspace will automatically open the newly created module in the main content area for you to begin adding content.
You can also create sub-modules (nested modules within existing ones) to build a more detailed hierarchy.
To create a submodule:
Select the module in which you want to add a submodule to and then select Add submodule.
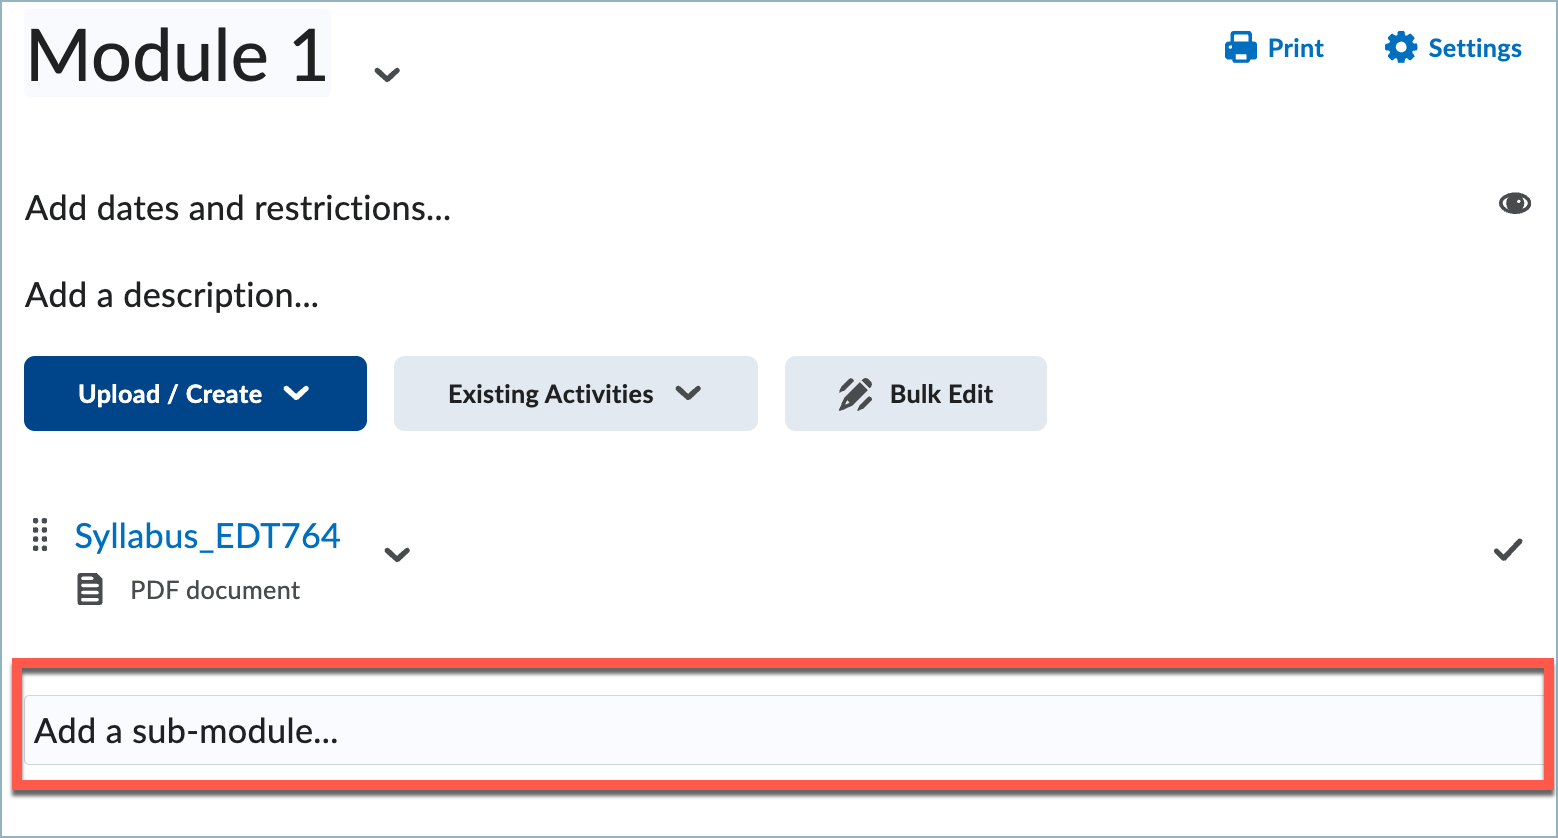
Enter the name of your submodule and select Enter. The submodule is added to your module and you may upload, create, and add activities.
-
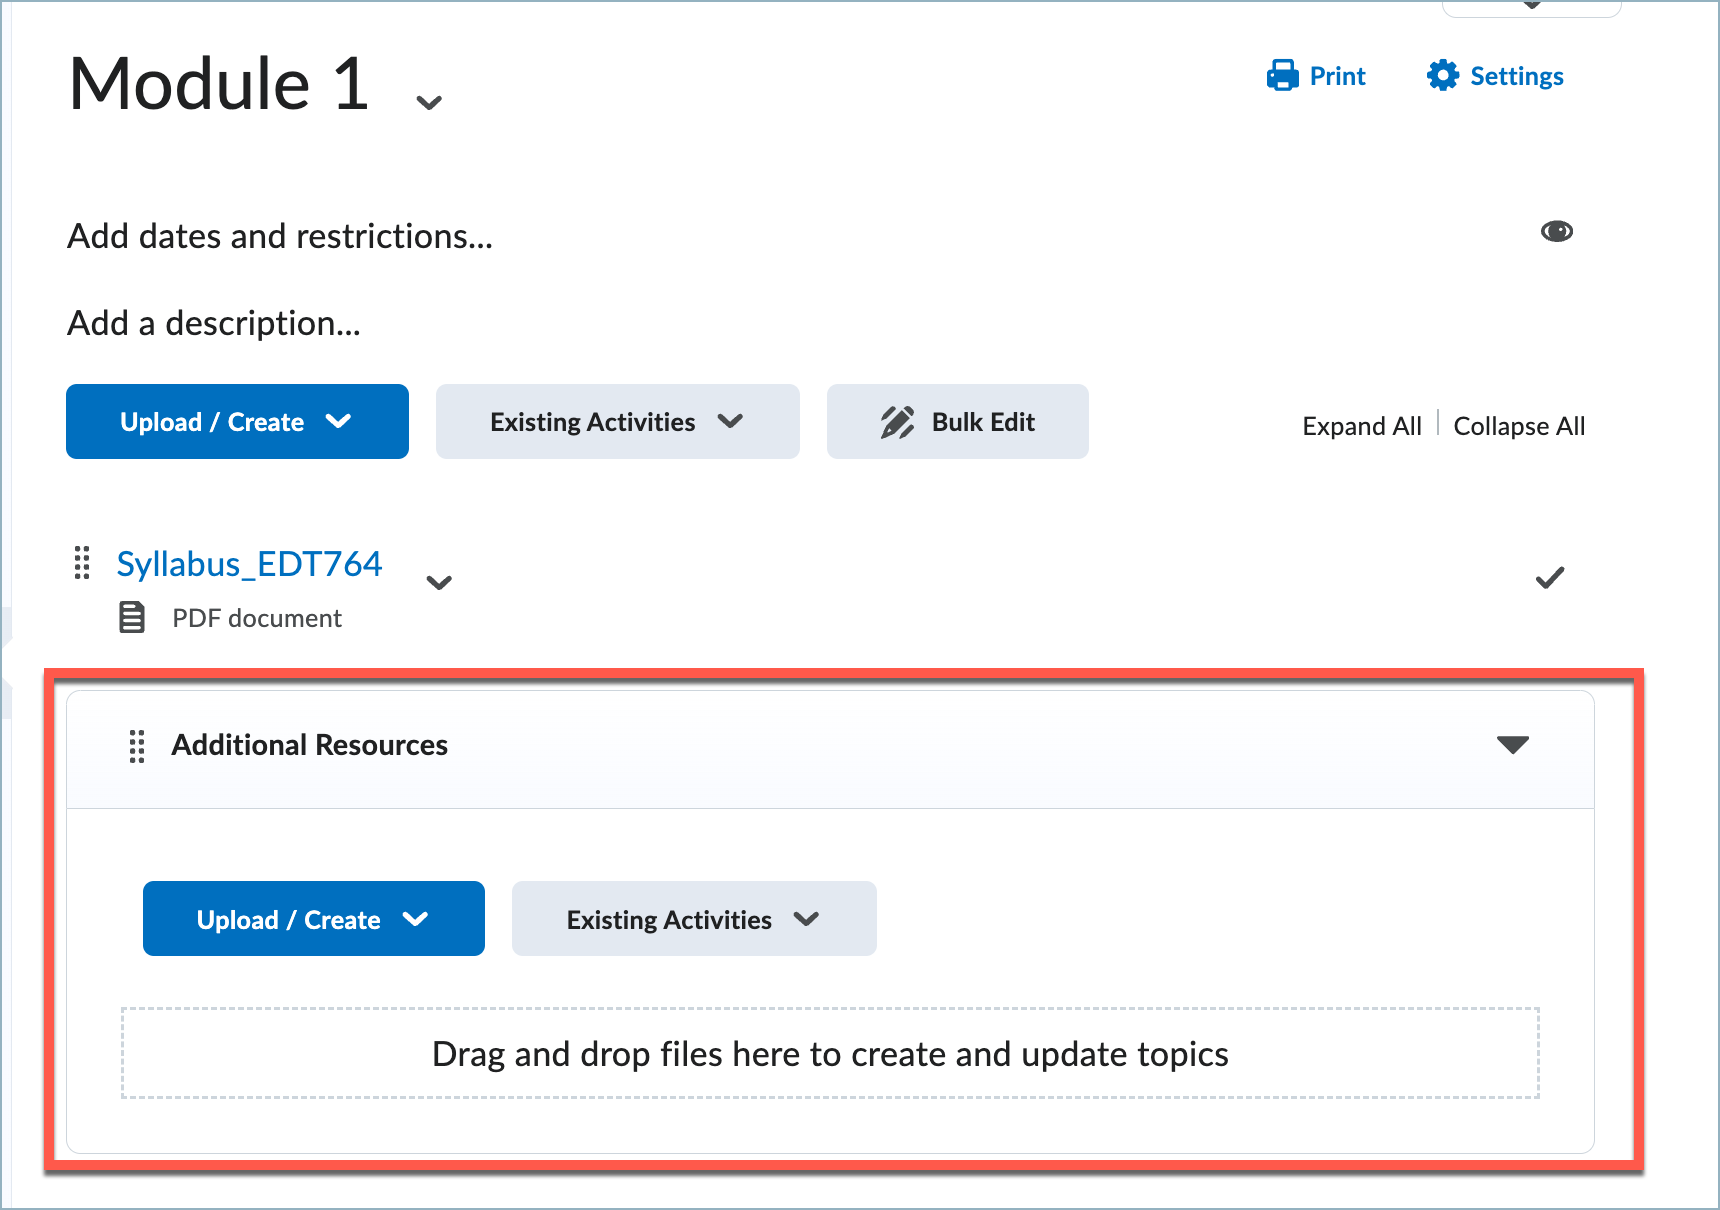
Content added to a module or submodule are referred to as Topics in Brightspace. To add new content select the Upload/Create option.
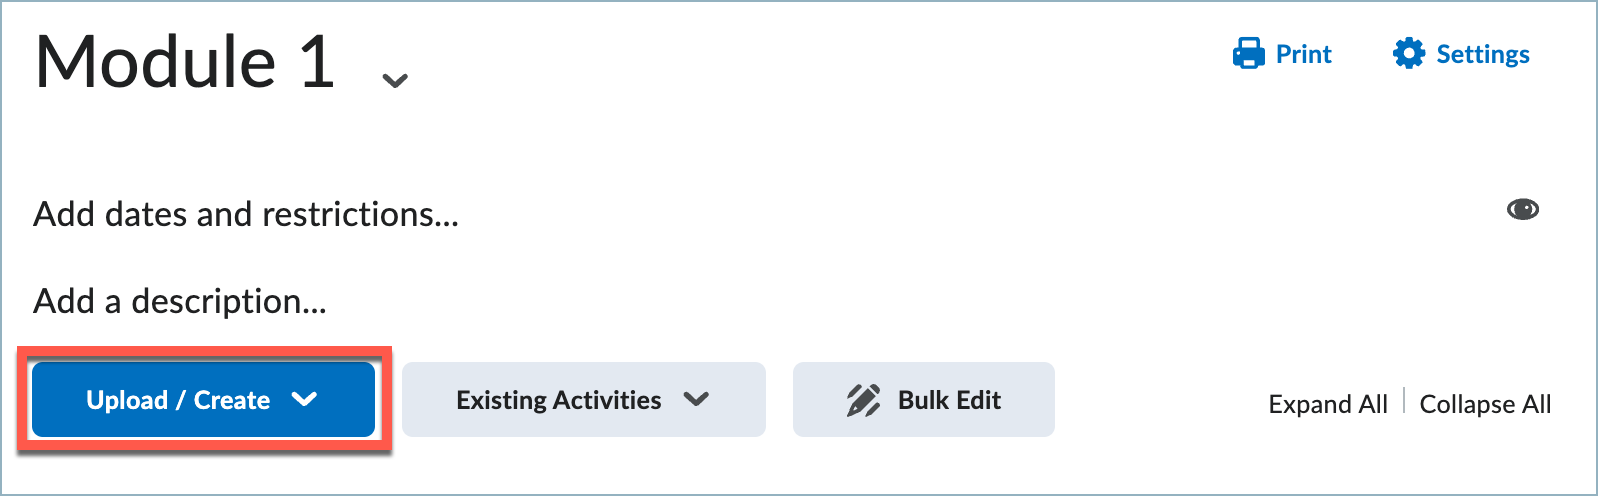
Under the Upload/Create button you have the option to add/create:
- Files from your computer, select Upload File.
- video or audio topics, select Video or Audio.
- HTML page/file, select Create a File.
- To add a link, click Create a Link. (it is recommended that all links are set to open as external resources.)
- existing files from Manage Files, select Add from Manage Files.
- a new checklist, select New Checklist.
- a new discussion topic, select New Discussion.
- a new assignment, select New Assignment.
- a new quiz, select New Quiz.
- a new survey, select New Survey.
To add a file from your computer, such as a course syllabus:
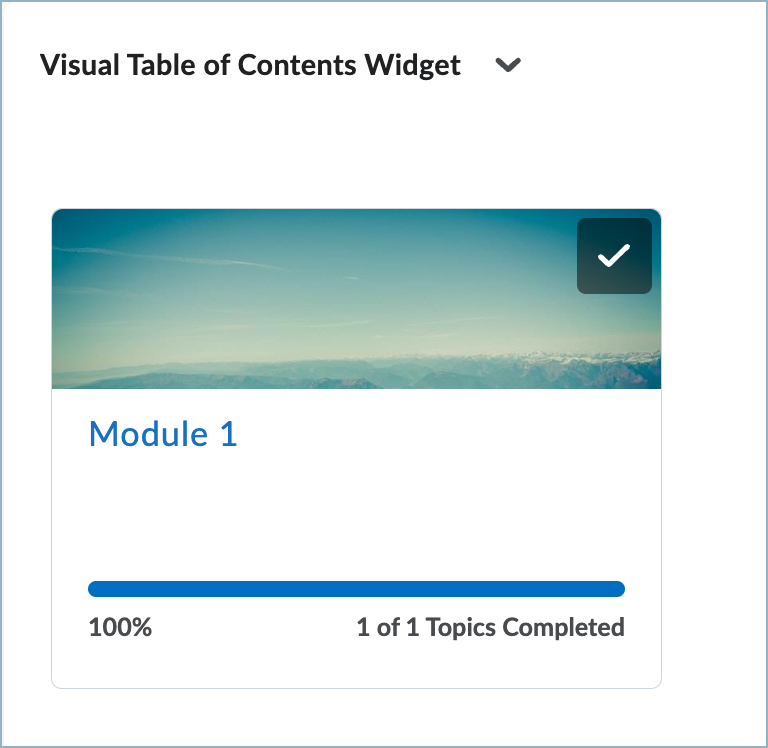
Access a module from the Visual Table of Contents Widget on the course homepage,
You can also access a module by selecting the Content option on the main course menu, choosing Content from the list and then selecting the module from the Table of Contents panel.
Select the Upload/Create button, choose Upload Files.
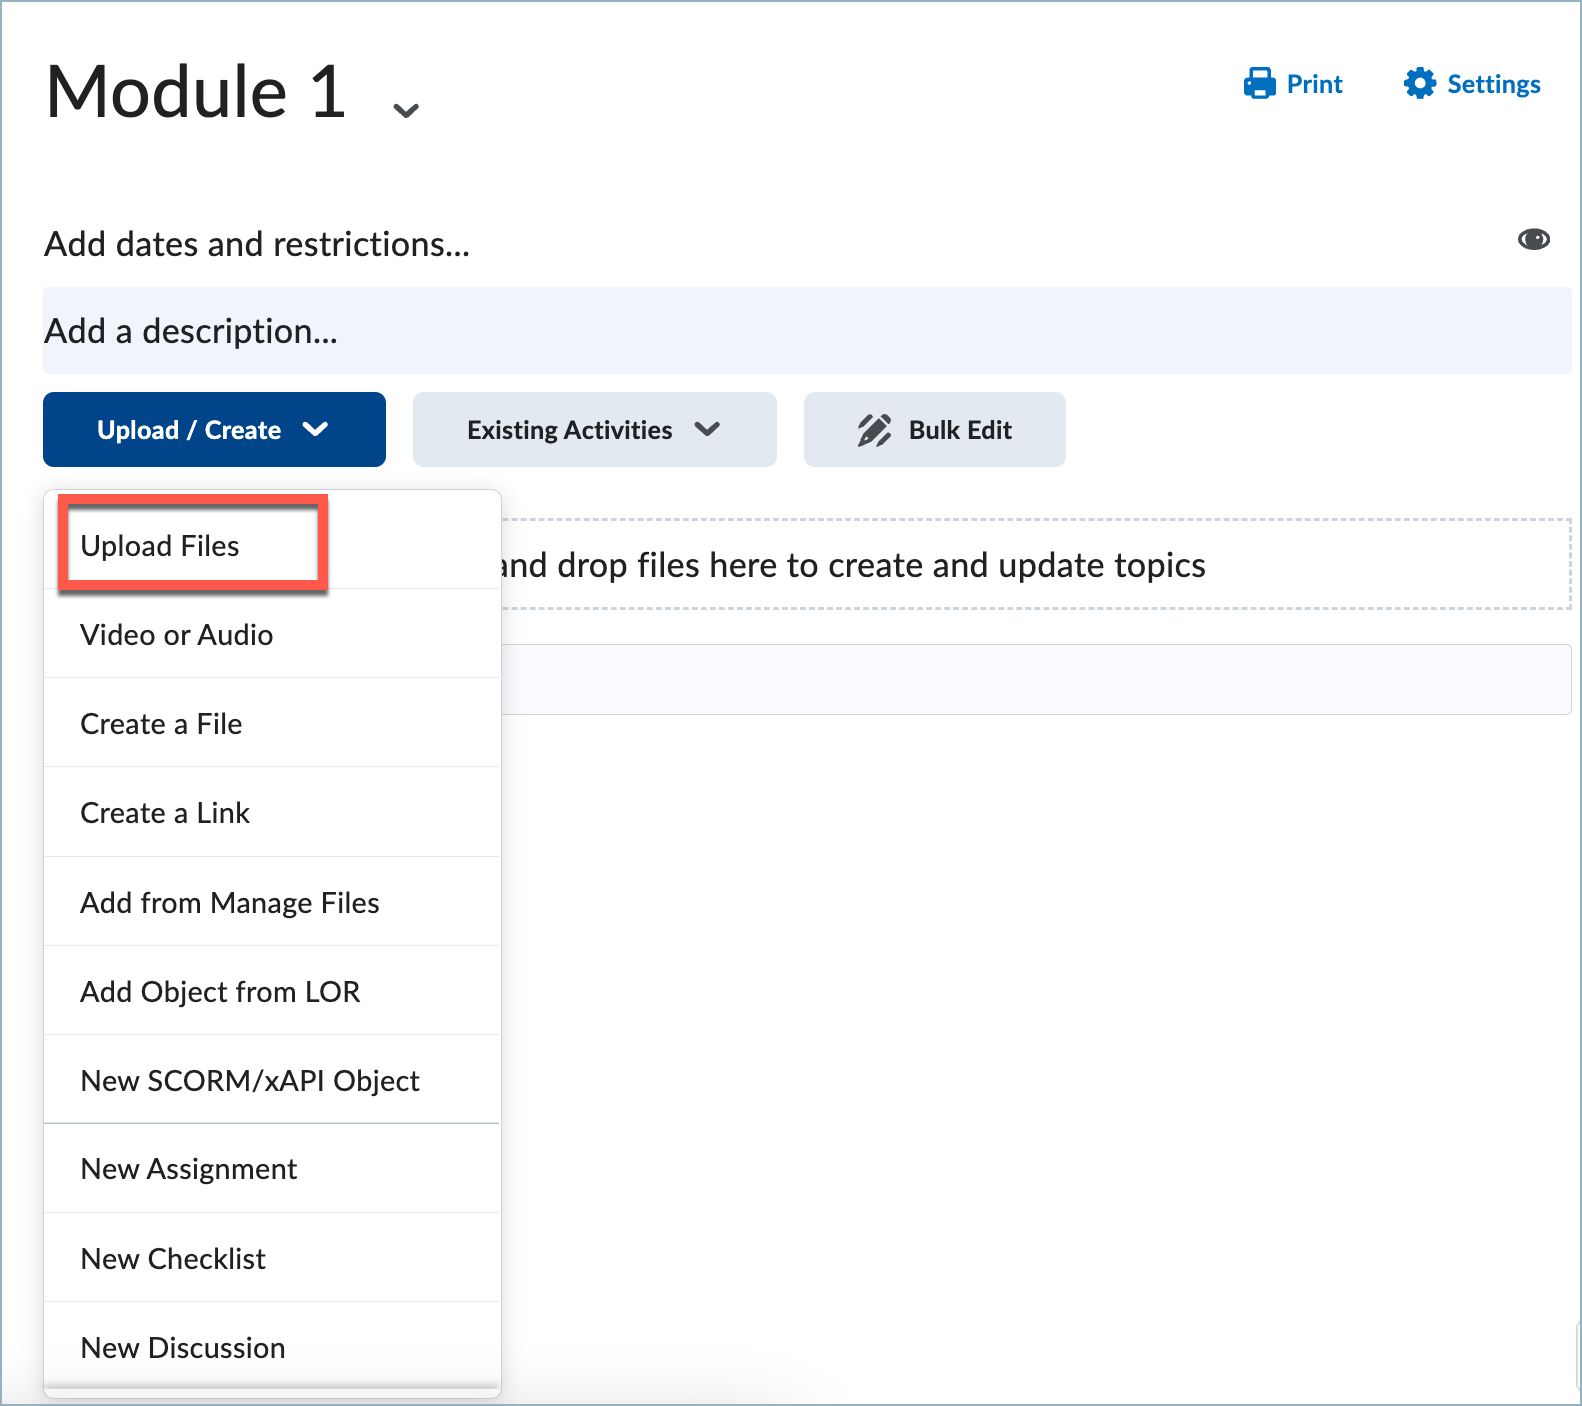
Next, select the option from where you will retrieve your file.
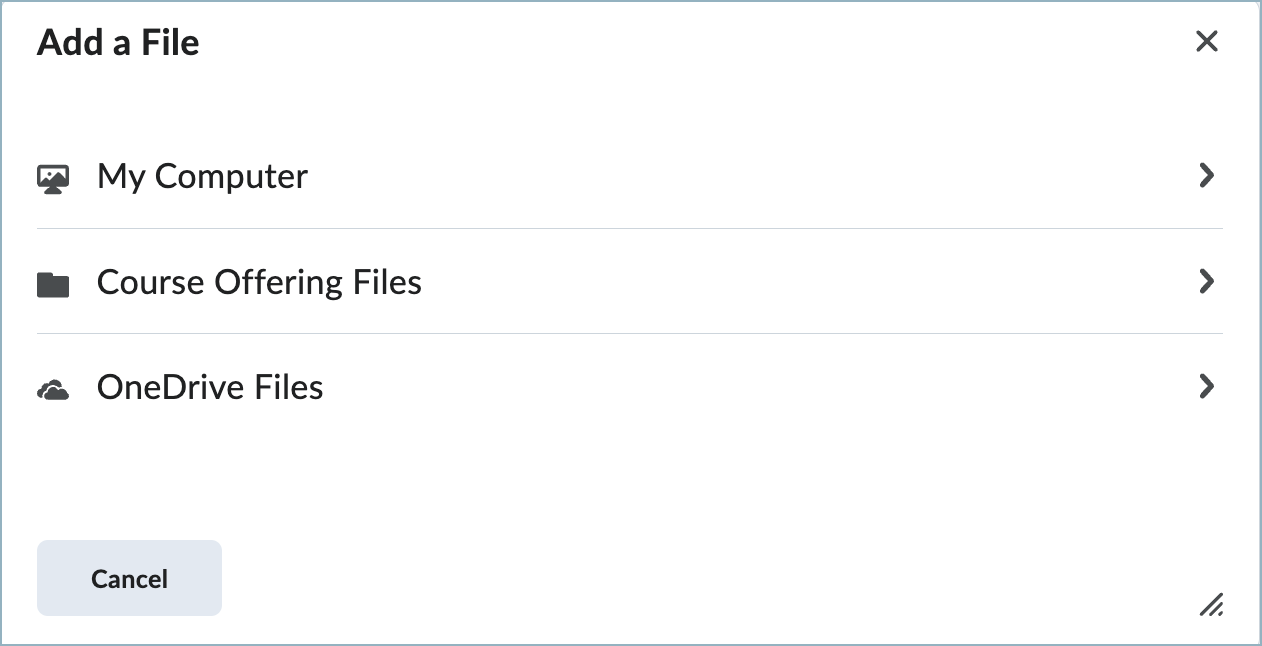
- If you select My Computer you can simply drag and drop your file from your computer into the Upload File section. Alternatively, you may also select the Browse option to open a file search dialog box. Locate your file and select open to add it to the Upload File section.
- If you have created an organizational structure in the Manage Files section of your course, you can also set the location (folder) where you would like the file stored.
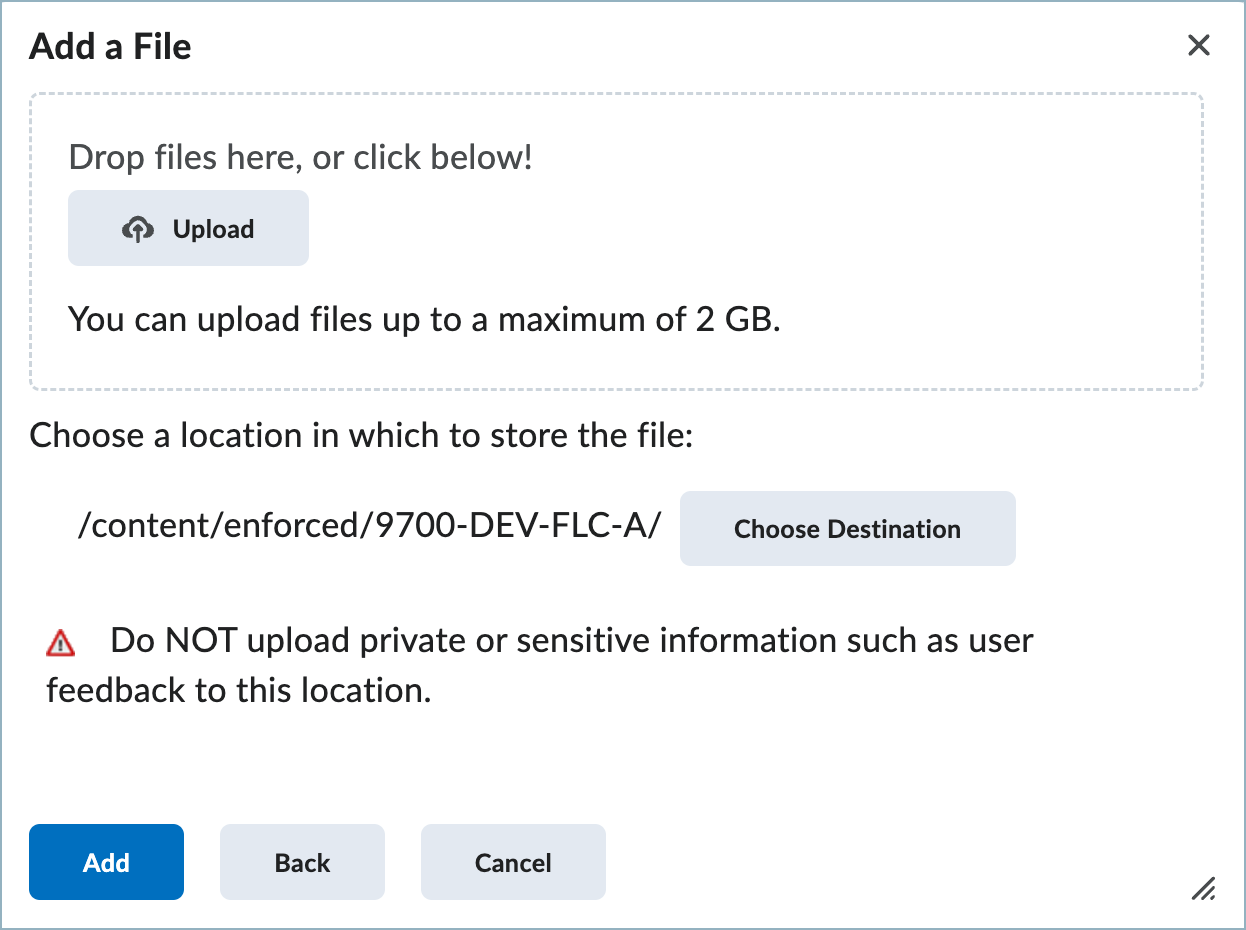
Select Add. Your file will now appear as a topic within your module.

-
Existing Activities to add existing content select the Existing Activities button.
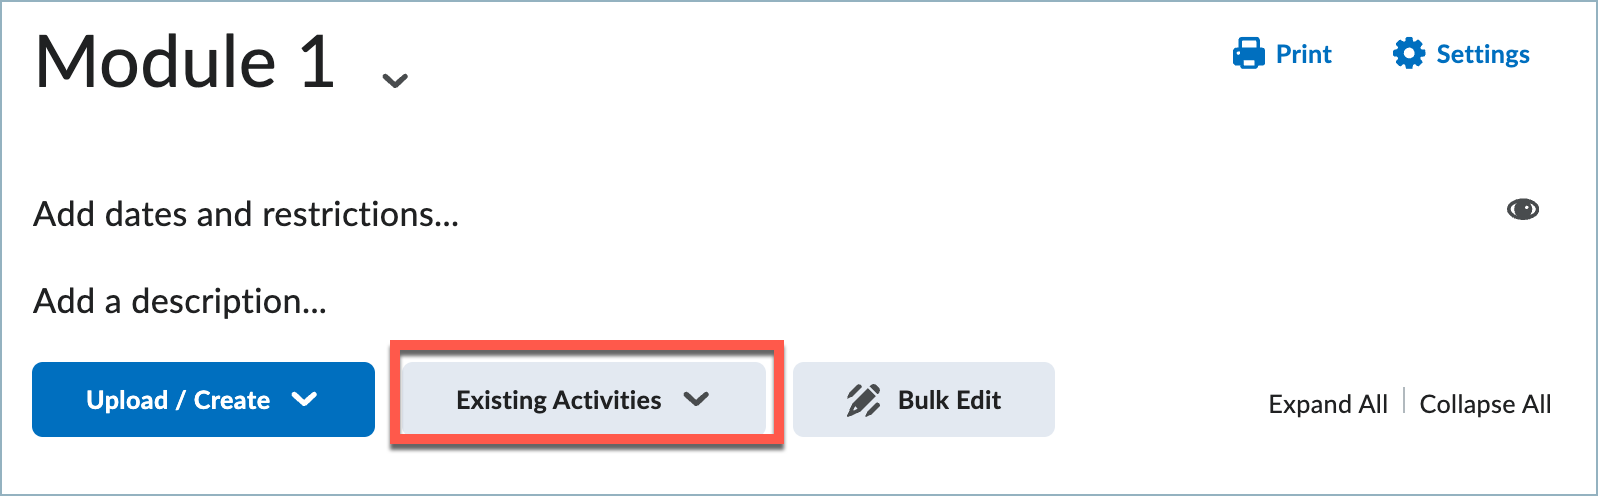
- To add an existing assignment, select Assignments
- To add an existing checklist, select Checklist.
- To add an existing discussion topic, select Discussions.
- To add an existing external learning tool, select External Learning Tools.
- To add an existing quiz, click Quizzes.
- To add an existing self assessment, click Self Assessments.
- To add an existing survey, click Surveys.
This is also where approved third-party and publisher content are located. For support connecting to third-party or publisher resources refer to the support services associated with those products.
-
Uploading videos to Brightspace is a great way to enhance your course content, increase student engagement, and support diverse learning preferences.
Brightspace utilizes a system-wide Media Library to store your uploaded media files. The Media Library provides access to simple video-editing tools and closed captioning.
-
D2L recommends that you copy all components between courses to ensure you maintain all desired associations, and then delete any undesired material in the new course.
To copy your course content you will need begin by accessing the new course in which you want to copy content into.
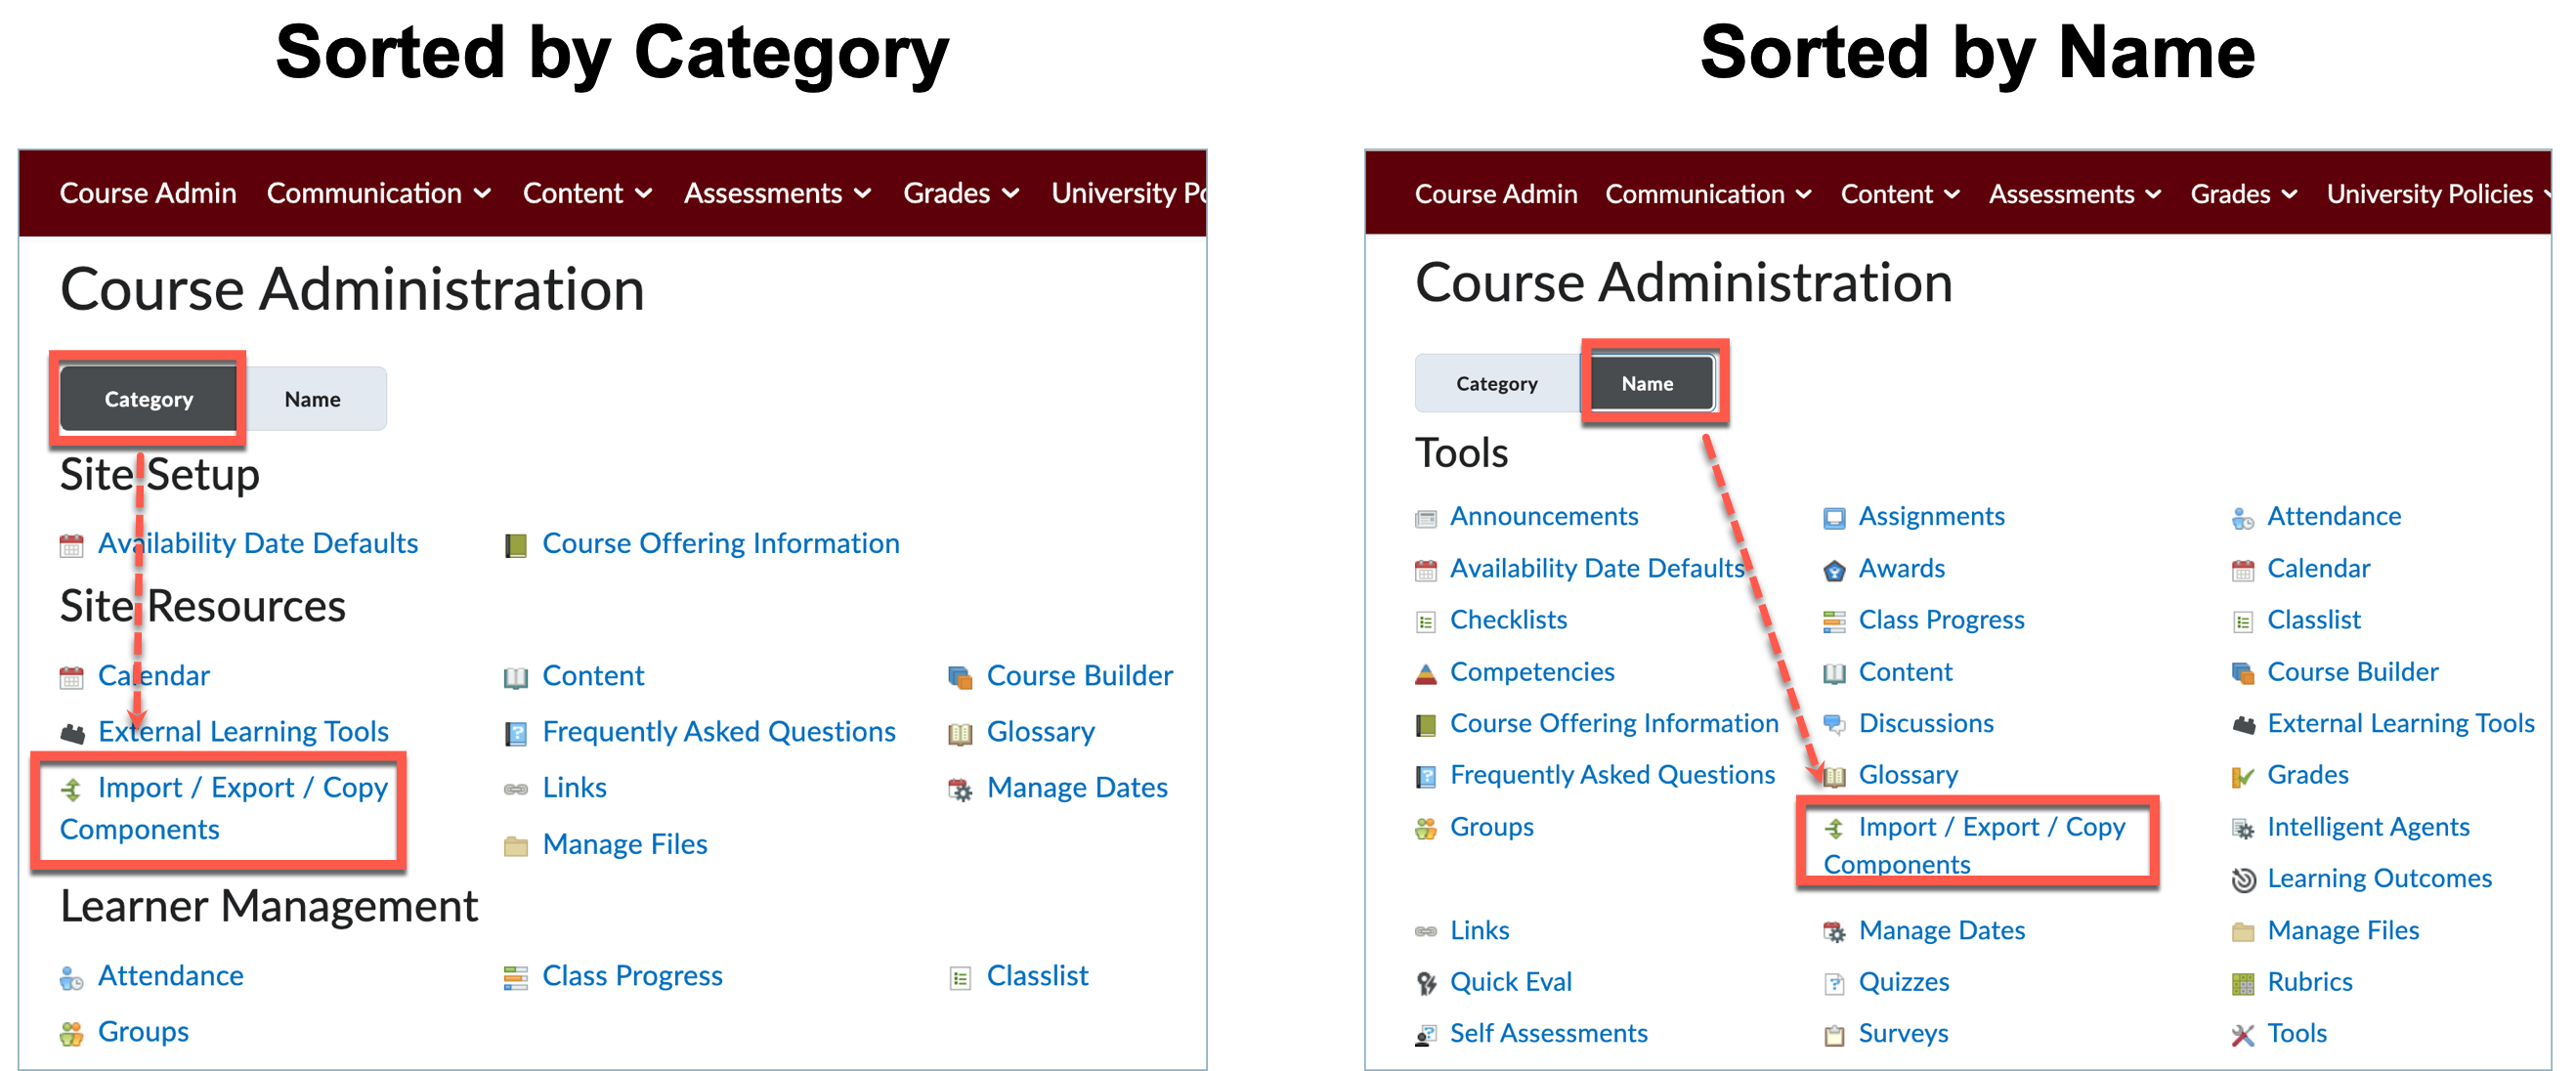
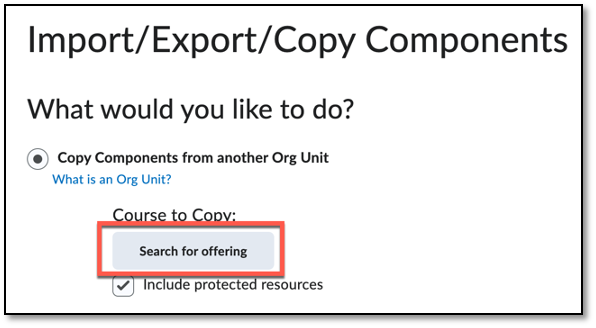
Select the Course Admin link from the course navigation bar. Next, select Import/Export/Copy Components.
(You can sort the Course Admin area by "Category" or "Name". How you choose to have it sorted will impact where the Import/Export/Copy Components tool is located.)
Select Copy Components from another Org Unit (default selection). Then select Search for offering and locate the course offering containing the components you want to copy.
Next, choose Add Selected and then select the Copy All Components button.

Once the copy process has finished you can choose from the following options:
- To copy another package into the same course, click Copy Another Package.
- To see the results of your copy, click View Content.
- To review and manage course dates, click Review and Manage Dates.
-
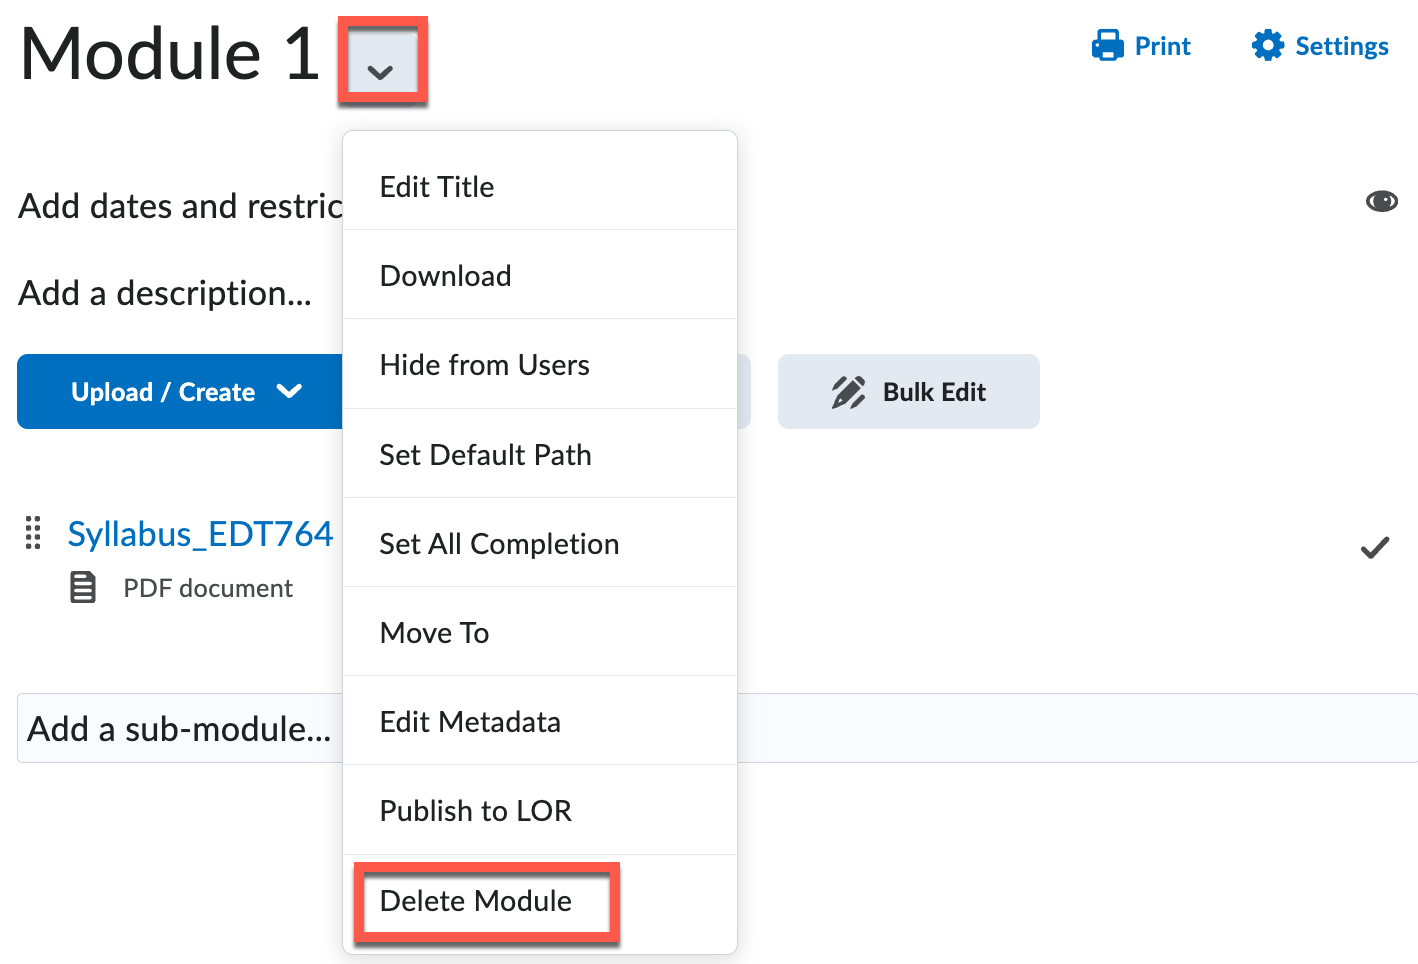
To delete a module,
Access the module from the Visual Table of Contents on the course homepage.
You can also access a module by selecting the Content option on the main course menu, choosing Content from the list and then selecting the module from the Table of Contents panel.
Next, select the down arrow next to the module title and select Delete Module. Note: deleting a module will also remove any content that within that module.
Once you select Delete Module, the Delete Module dialog box will appear. Choose whether you would like to only remove the module and its contents from the content view of your course (default option) or if you would like to permanently delete the module and its contents from the course.
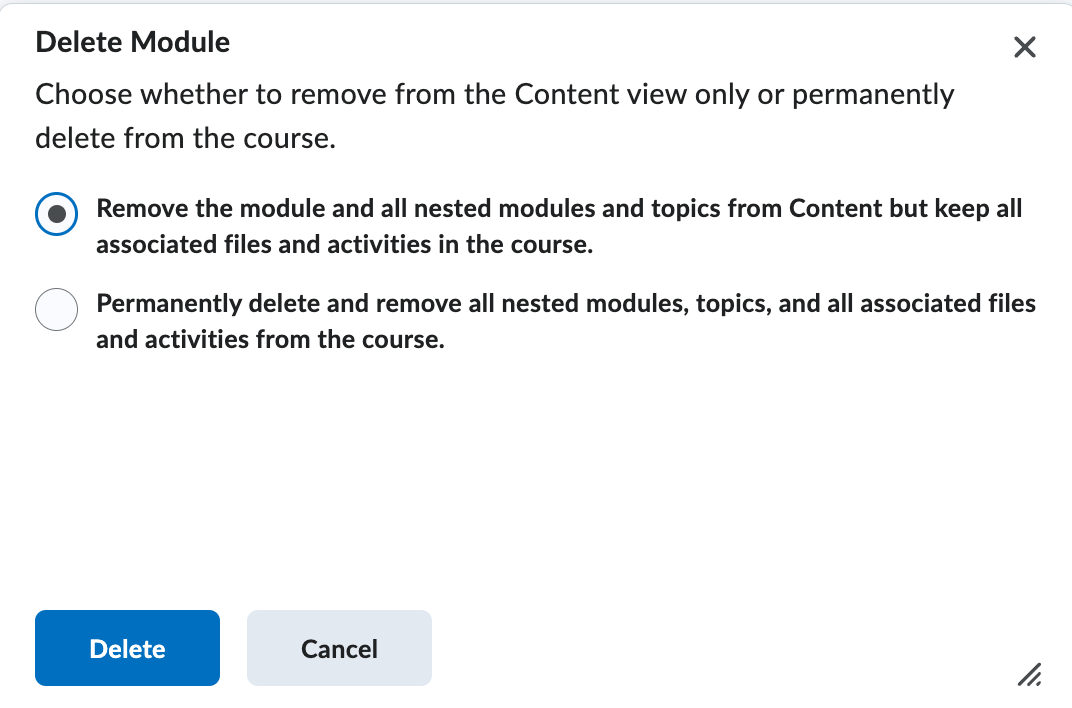
- (Default) Remove the module and all nested modules (submodules) and topics from Content but
keep associated files and activities in the course.
- This means any files or assessments you have linked to will still remain in Brightspace after the module has been deleted.
- Permanently delete and remove all nested modules, topics, and all associated files
and activities from the course.
- Selecting this option will permanently remove from Brightspace any files or assessments that were in the module.
- (Default) Remove the module and all nested modules (submodules) and topics from Content but
keep associated files and activities in the course.
-
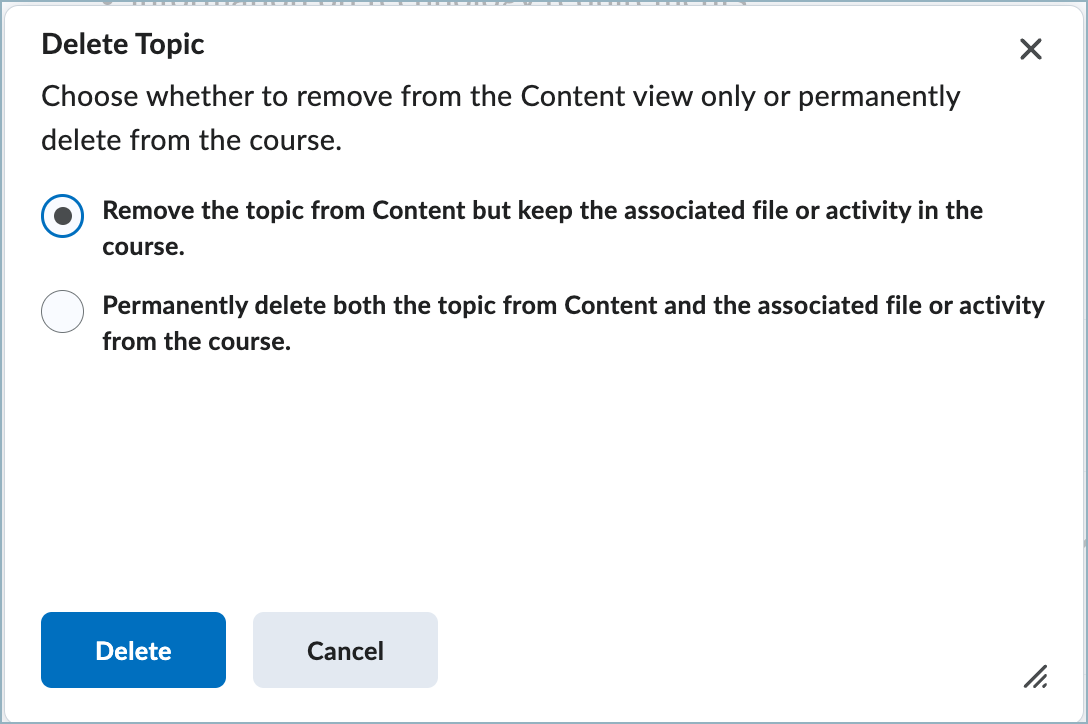
To delete a topic:
Locate the topic you want to delete in a course module.
Select the down arrow next to the topic title and select Delete Topic from the list of options.
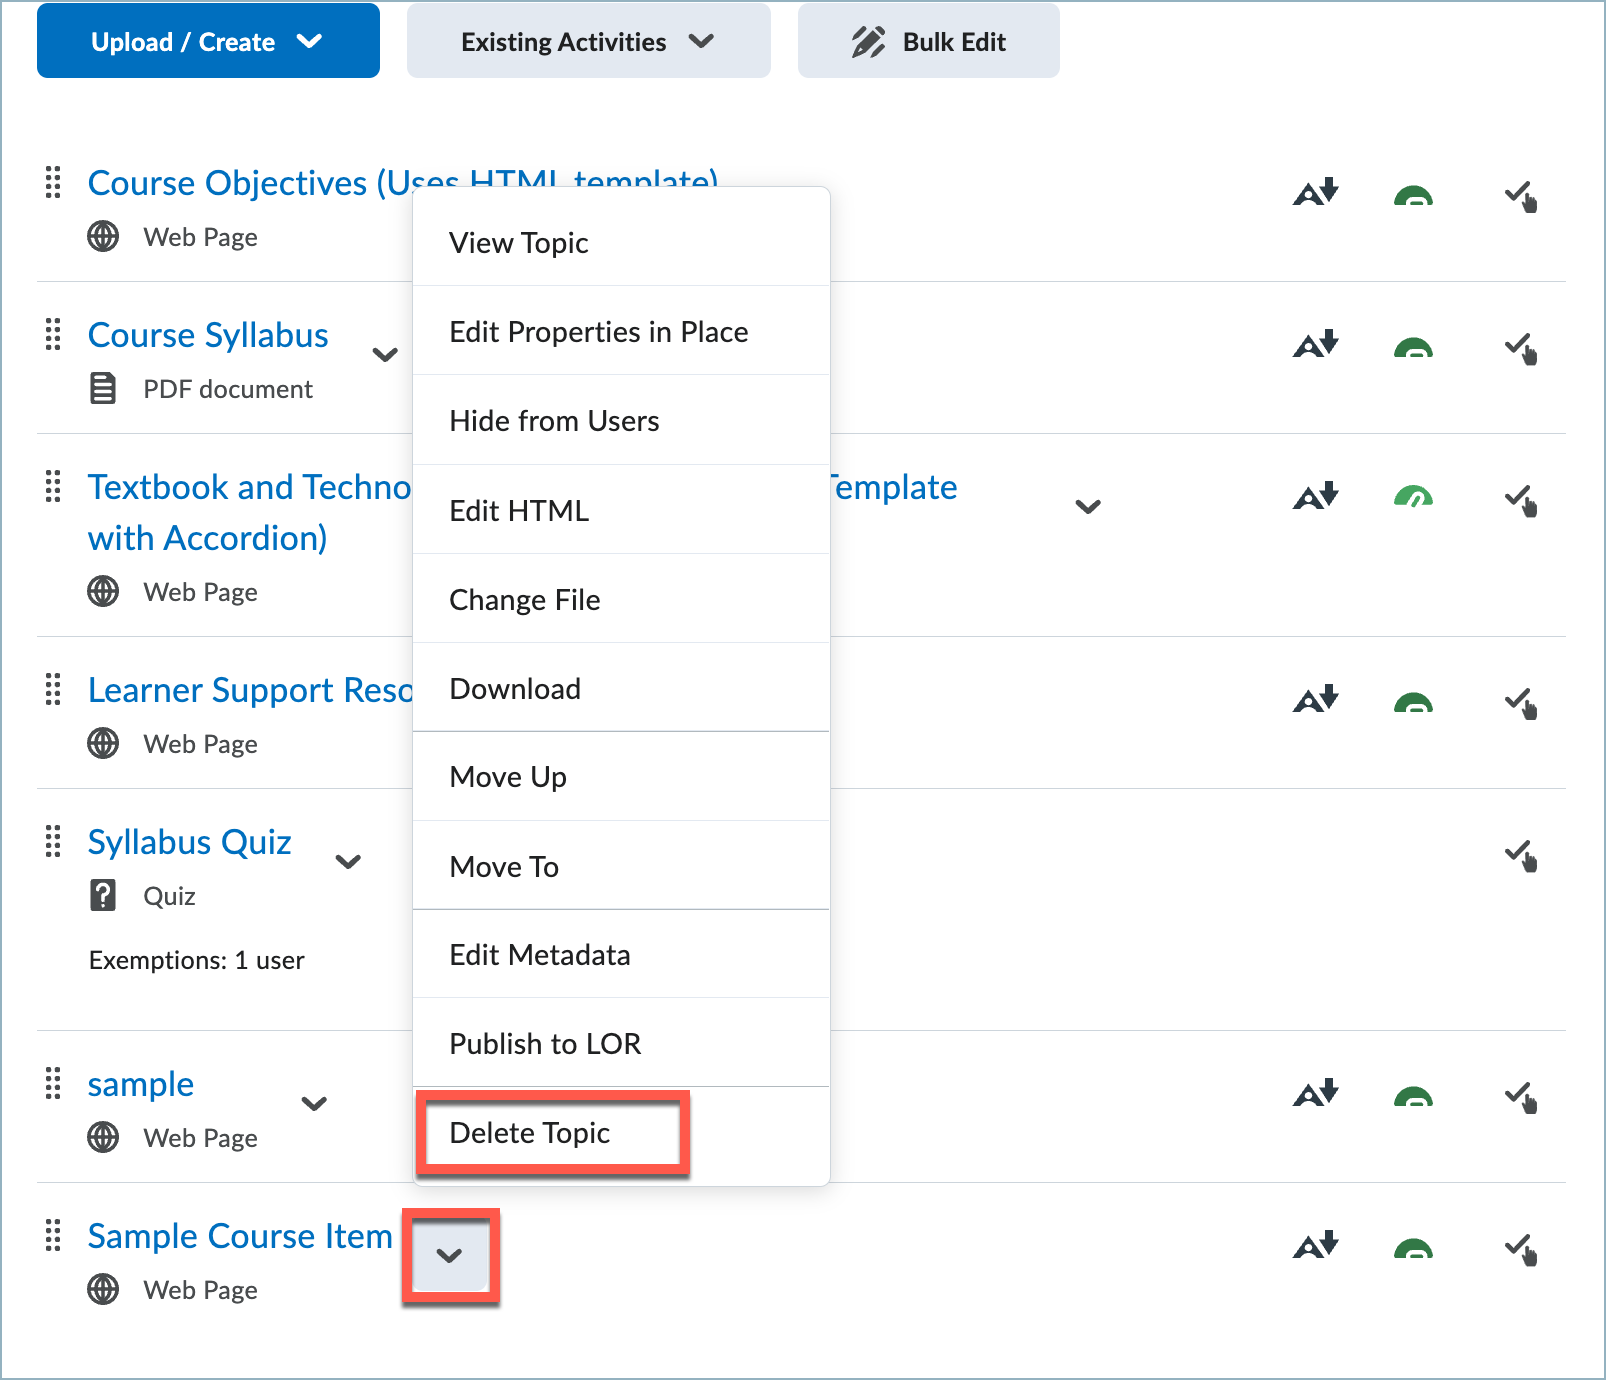
Next, on the Delete Topic Dialog box, choose whether you would like to only remove it from the content view in the module (default option) or if you would like to permanently delete the item from the course.